Showing posts with label Tablespoon of Geek. Show all posts

Thursday, October 25, 2012

Tablespoon of Geek: Bite sized tacos


Here we go yet another Thursday and time for me to share my exploits from being in the kitchen. Before I get started sharing one of my many recipes with you let me first start by explaining what the near future will hold. For starters if you have not been keeping up with my blog I am moving to a new house, YAY, this good news bring some other things with it. The moving day is swiftly approaching with only three weeks to pack until we can occupy our new home.

What the move means is that up until that time I will not have full access to my all the things in my kitchen. Therefore until after the big move that is happening on the 15th of November and probably the week after I will not be able to cook anything. Really and truly I hate that I am not able to deliver what I have promised I would with this cooking segment. Sometimes life can really seem to get in the way of the life goals that we set out for ourselves.

Ok now that my sob story is done I can carry onto what I have planned out to show all of you today. Every Friday I tend to have a little geek get together that involves us all throwing dice and end up having a bunch of hungry mouths at my house. We take turns on which one of us is set to provide the nourishment each week and it just so happened to be my turn.

A couple of months ago I re-pinned on Pinterest a recipe for two bite tacos, I remembered this and decided that it would be perfect. One big problem occurred with this plan however when I went back on to Pinterest to find this recipe much to my dismay the link was broken. My only option for making this recipe was to get a little crafty and resourceful with only an image to use as a guide.

Here is my recipe Bite Sized Tacos

For any recipe it is best to start by listing the components that go into making it.
Ingredients:

1 pack of Spring Roll Pastry
1 lb of Ground Beef
½ a Green Pepper chopped
½ a Red Pepper chopped
¼ of a White Onion chopped
2 Cups of Marble Cheese
1 Jar of Salsa (you will not need the whole jar but it helps)


And as Always don’t forget to spice to taste, here is what I use


For starters put a large skillet on the stove element and bring it up to high heat with some cooking oil add turn on the oven to pre-heat at 350 degrees. Once the skillet 
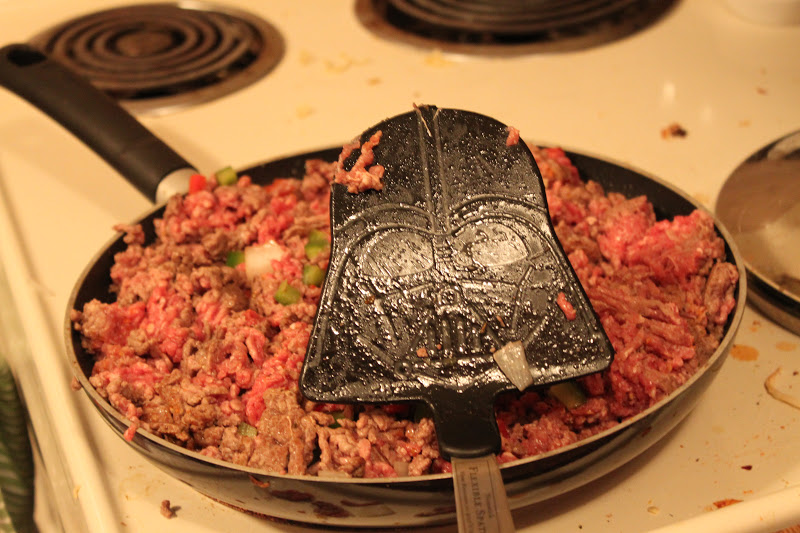
has reached optimum temperature take the Ground eef and dump it carefully into the pan, and break it up with a spatula. The meat will start to brown and once you have separated it up a bit add the chopped up Green Pepper, Red Pepper and White Onion. Continue mixing it up with the spatula and then add the spices of your choice as well I like to add a little bit lime juice, fresh is best. To help the meat cook nicely you can add ½ a cup of water but this may mean that you have to drain the meat later or make your tack shells soggy.

The meat should be a consistent light brown once this happens then it is time to remove it from the heat. Using a muffin baking pan line all of the cups with the Spring Roll Pastry, one per cup and fold the corners in. Using a common spoon, ladle the cooked meat mixture into the pastry cups eyeball this and try not to have it over flowing. On top of the meat put a spoonful of salsa, I use a corn and bean Salsa because I find it has a little bit more kick to it and is less runny. Top them all of with a sprinkling of the shredded Marble Cheese, this is a to taste type deal so you can add as little or as much cheese as you want.

Take the filled muffin try and place it in the oven to bake for between 10 to 15 minutes, or until the cheese is nice and melted.

And Serve

This is one of those things that takes a lot of prep work to make but is great finger food for parties. The one thing I need to still figure out is what to use instead of the spring roll pastry, any ideas let me know.

Sincerely Urban Yeti

Thursday, October 11, 2012

Tablesppon of Geek: the Almost Thanksgiving Turkey


Thursdays have started to mean something to me as of lately, they mean showing off my ever developing kitchen skills. With the Canadian Thanksgiving this past Monday I had hoped to use that as an excuse to learn how to make a turkey. Things were however a little out of my control in the kitchen as I was not in my own kitchen for this Thanksgiving.

My plan initially was to have my Wifey’s grandmother teach me how to cook up a plump bird while we were visiting. However by the time I asked her to show me the tricks of the trade she had already begun and said that she didn’t need my help with it. Oh well as they say ‘the best laid plans of mice and men often go astray” and I will always have next year to learn how to make a proper cooked turkey.

While Grandma Prince George was busy cooking in the kitchen the family all gathered around the table to play cards and chat. Apparently this is normal in the family for good ol’ Grandma to cook while the family keeps her company. At least she is not all alone in the kitchen and any time someone would try to help with any part of cooking she would quickly thank them and then kick them out of the kitchen.


This weekend I am going to see about trying to make a ham at home, or maybe try my hand at one of the many pumpkin recipes floating around the internet this time of year. I do apologize for their being no recipe two weeks running I had really hoped to be able to get one for this week but things happen. This weekend I think I will try and make a few things to back log a couple of recipes for later when life is complicated like this.

Sincerely Urban Yeti

Thursday, October 4, 2012

Tablespoon of Geek: Kitchen Products 1


Sorry folks this week there will not be a new recipe on Tablespoon of Geek due to the fact that there has been a lack of cooking for me. My schedule has been mighty hectic as of lately and I have not had the time to get in the kitchen and whip something up. I use to have a back log of things for a moment like this but while trying to back up my back log I lost it all.

I will not leave you high and dry however

There are some really cool kitchen gadgets that I have found online and am contemplating acquiring the. Some of the items I am about to show are not so much kitchen gadgets as they are dishes and means of serving meals.

The first item on my list of interesting food enhancers that I am going to share is a spray can travel mug. It is an insulated travel mug designed to look as if you are swigging down your hot beverage out of a spray paint can. Perfect gift for the little vandal deep inside all of us, and also imagine the disgusted faces of people who think you are drinking paint


Find it here: Spray Can Travel Mug

Now for a really remarkable kitchen item that would make the process of steaming vegetables ten times easier. It is a silicone vegetable steamer called the “Little Vebo Vegetable Cooking Basket” made by a company called Dreamfarm. The concept is relatively easy to execute you place water on the bottom of a pot, put this little device in the pot on top of the water and then place the veggies you want to steam in this. After you have boiled the water and the garden greens are soft and ready to eat you can use the convenient handles to remove the veggies and then serve them.


I don’t know about anyone else but my fridge is always covered in magnets, none are useful in the slightest but they always make a kitchen feel more lived in. well now finally there is a fridge magnet that has a secondary function other then adding personality, it is a kitchen timer. It is function going for it but it also has looks to go with it because by adding it to your fridge or freezer they will now look like they are a bank safe. That is right it is a Safe Lock Kitchen Timer Fridge Magnet, so if you choose you can pretend to be robbing a bank all while getting a snack.


Thanksgiving this weekend and I may be learning how to make a Turkey from Wifey’s grandmother if I ask nicely. Hopefully next week I will actually have a recipe to post up here, I am a little sad one of my best received recipes was lost… oh well guess I have to redo it.

Sincerely Urban Yeti

Friday, September 28, 2012

Tablespoon of Geek: Back-to-School Tuna Sandwich


The month of September is coming quickly to an end with only a couple of days left until the changeover to October happens. During this past month I have themed my “Tablespoon Of Geek” posts around what I believe to be the major event of the month, back to school. Now that the changing of the months is upon us this means that today it will be my last “Back to School” recipe post for the year. 

For those who have been keeping up my back-to-school recipes have been aimed at the broke and starving college student. Essentially the idea is to take all of those cheap bulk meals and enhance them into something that is actually tasty. With all the recipes it did not cost me more than 20 dollars for all the ingredients and made the servings large enough for at least a couple meals at that price.

Up to this point I have used the college food essentials of Kraft Dinner, Ichiban and Peanut Butter Sandwiches. Talking to my friends and speaking from my own experiences there are still a number of other things that helped to keep their bellies full during times when money was more than tight.

For today’s recipe I will be using the ever cheap can of tuna, in making Cheesy Tuna Melts.

Ingredients that are needed for two open face sandwiches will be as follows.

1 Can of tuna
2 slices of Bread
1 tbsp of Mayonase
2 tbsp of Ranch Dressing
¼ cup of chopped Celery
2 tbsps of Parmesan Cheese
2 slices of Tomato
2 slices of Swiss Cheese
1 tbsp of Honey Mustard


Turn on your oven and set it to 350 degrees this will come in handy at a later point.

Start out by getting a small to medium sized bowel and then empty the can of tuna into said bowl. Now add the Ranch Dressing, Parmesan Cheese, Honey Mustard and the Celery to the Tuna and mix it all together by use of a fork.

Slather the Mayonase onto the two slices of bread evenly on one side, then on the mayo side place the slice of tomato. The next step is to put half of the Tuna mixture on top of the tomato on each of the bread slices, and then top them both off with the swiss slices. Once this is complete place both the open face sandwiches onto a baking tray and place in the oven for 15 min.


Once the cheese is all melty on top they arready to serve and devour, so Enjoy. This dish is very salty and I find it best to serve with a side of something sweeter like a healthy choice of fruit.

Sincerely Urban Yeti